
How to :: Make Your Own Studio Curtains (Café Style)
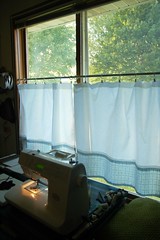 I finished the curtains for the studio a bit ago and wanted to help you make your own. It’s a simple process with just a little bit of math involved. Nothing scary. Promise.
The first step is to determine the kind of curtain rod you will be using. Will you be able to set it in the frame like I did and use a spring rod (a)? Or will you have to mount brackets and use one of the bent rods(b)? Take a look at your window and figure it out. Do you have blinds that the curtain will need to go around? better go with the brackets.
What about placement? If you go with the brackets, will they go on the wall next to the window or be mounted to the window frame? Figure it out either way and measure from one side to the other where you are mounting it. That is measurement A.
++++++++++++++++++++++++++++++++++++++++++


+++++++++++++++++++++++++++++++++++++++++++++
The second measurement you need to make is how long you want your curtain. If you are not sure, hold up a piece of fabric to the window and decide what looks nice, then measure that length. Measurement B.
If you are going have a contrasting panel, 8 inches is a pretty good length – that is completely subjective so you can change it up. Measurement C.
I’m going to assume you want two panels and you will be hanging them with rings by either using clip hooks (like I did) or eyelets and rings.
1. Take measurement A, divide in half + 2 (1 inch on each side for hem) + 8″ (allowing for gathering when you have them closed). i.e. 60″ wide/2 = 30″ + 2″ + 8″ = 40″
2. Then take measurement B – measurement C + 5″(4 inch top hem, 1″ for panel seam). For example, 30″ – 8″ = 22″ + 5″ = 27″
3. And for your panel, measurement C + 3″ (2 inch for bottom hem + 1″ seam allowance). 8″ + 3″ = 11″
Making Your Curtains
Taking those calculations you will now make your pieces
- Main panel, cut two: 40″ X 27″
- Contrasting panel, cut two: 40″ X 11″
1. Sew main panel to contrasting panel and press the seam flat (1″ seam allowance)
2. Fold, press, and sew bottom and top hems (2 inch on bottom, 4 inches on top). Press again once sewn.
3. Fold, press and sew the side hems (1 inch on each side).
4. Insert grommets, or if you are making a channel, sew a second line of stitching 1 1/2″ inches from the top. Place grommets 1″ from the top. If using clips like I did, skip this step.
Install curtain rod, add rings, and hang up!

++++++++++++++++++++++++++
I wussed out yesterday with the site reorganization. I realized after getting into it a bit that I have to update wordpress, which I haven’t done in awhile because the template is no longer compatible with new wordpress template standards. Anyway, so it’s not just updating and reworking the template, it’s changing over wordpress to the most current version too. I would have attempted it except Jason was out of town and if I messed it up, he wouldn’t have been able to fix it until tomorrow. Depending on how things go tomorrow we might attempt it. A lot of it depends on my confidence in my ability to not destroy the site and Jason’s workload – so he can fix it if I do destroy the site. We are backing things up, so worst case scenario is that it goes down or looks unformated for a few days. We will see. Maybe we will wait until Sunday for that deadzone of 2am – 6am like Etsy does :) Either way, new things are coming and once it does get all fixed up the site will be a million times more reader friendly and… ad free! Yikes. I think my Craft Leftovers Monthly sales are strong enough to ditch the BlogHer ad and replace it with smaller ads for people/products I personally love and hand pick. More on that once the site has its new look.
Happy Crafting!
Kristin

